
做 2D 遊戲的應該都遇過這題:同一個角色要再出幾種配色,顏色要一眼分得出來,整套動作格每一格還得一致。聽起來是「調個色相就好」的小事,實際做下去踩了五條路。環境是 Unity 加 Python,素材是逐格 PNG 精靈圖。先講結論:最後定案是 ControlNet img2img 重上色,但起點不是原圖,是 Meta SAM 2 部位遮罩換色出來的結果,跑完再用鎖定遮罩把斑點、眼睛、效果符號換回去。下面是每條路怎麼翻車、怎麼活下來的。
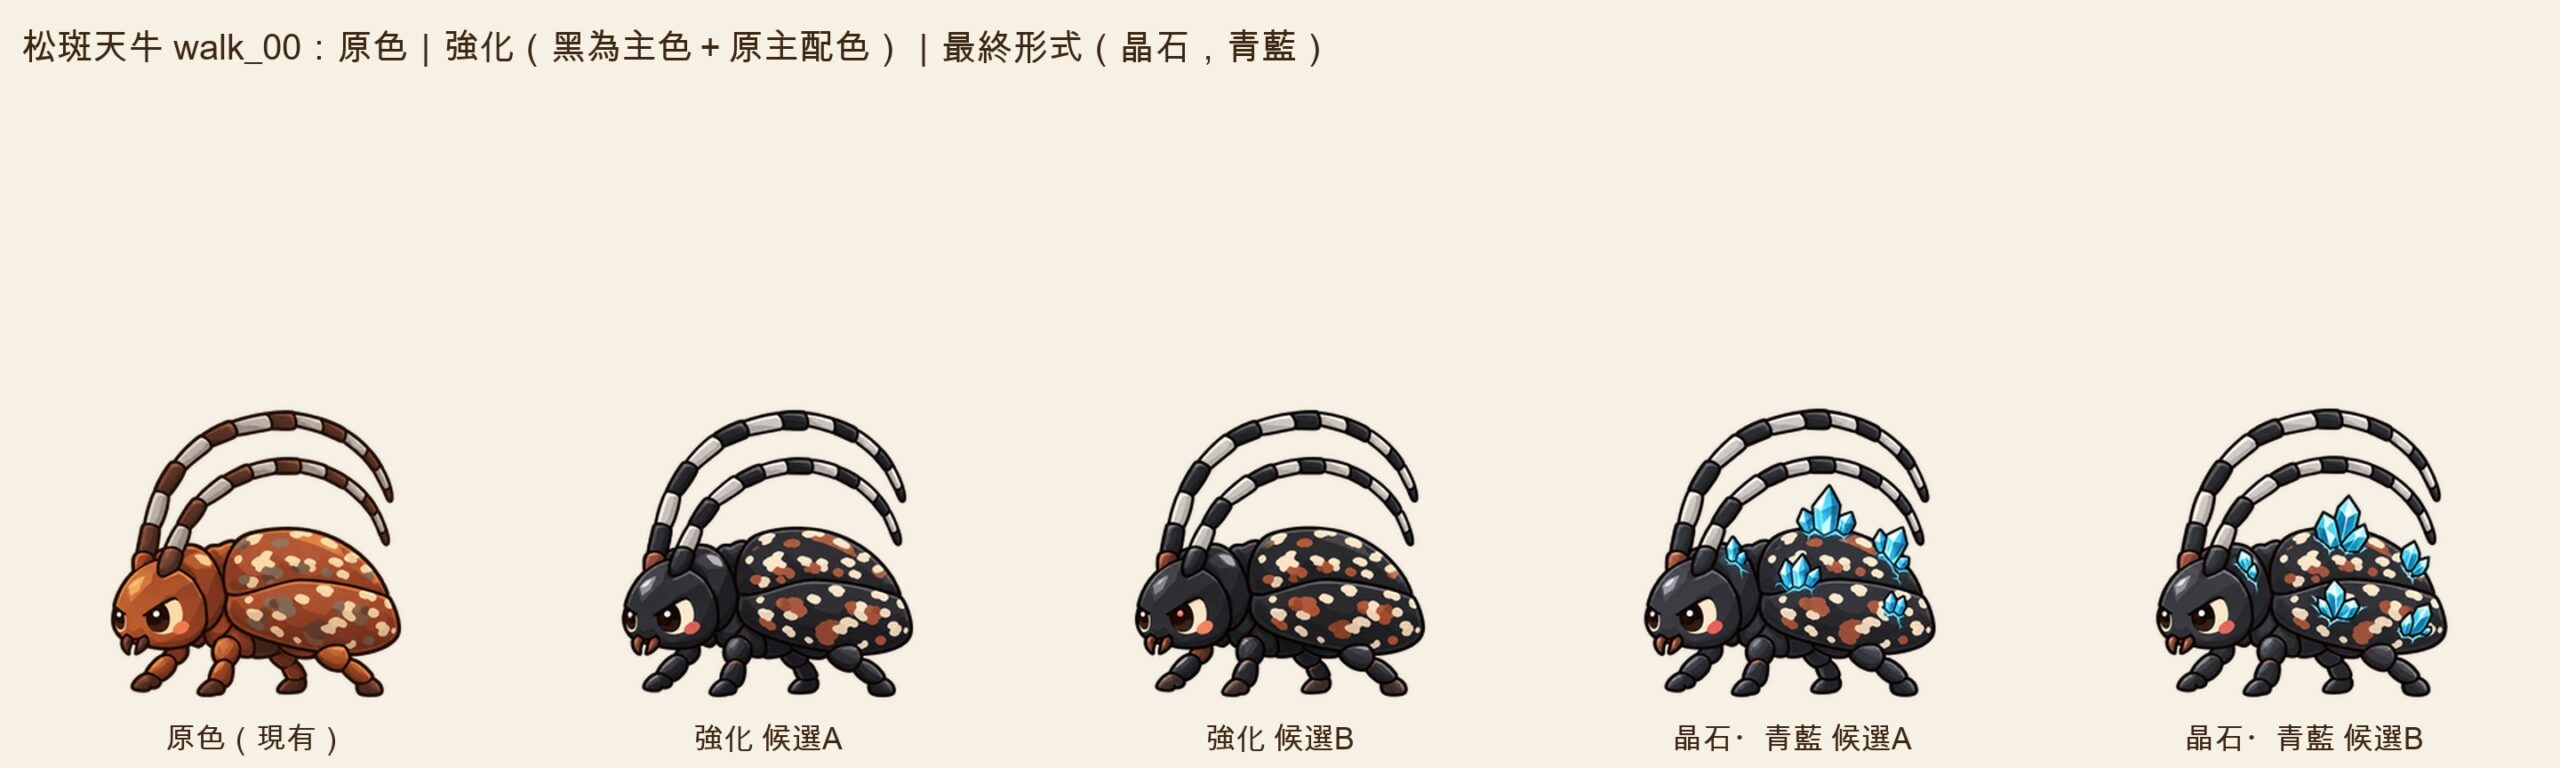
做法 1:Unity Sprite shader 整隻色相偏移
最直覺的那招。寫一支 UI/Sprite 用的 hue-shift shader,參數就色相偏移加一點飽和度、亮度微調,可以跟既有的著色效果疊用。兩種變體一個偏紅紫、一個偏青藍,先用 PIL 照 shader 公式算離線預覽,省得每次進 Unity。
在遊戲建置的截圖裡,幾個角色在深、淺底跟遊戲畫面底都分得出來,描邊和亮面也沒走樣,算是能用。但整隻偏色就是整隻偏色,眼睛、斑點、效果符號全部跟著變,比較過幾種做法之後決定改走遮罩換色加漸層對應、再加一個小標記,這招就退場了。
做法 2:色塊自動遮罩加 gradient map
那就不要整隻換,只換該換的部位。用腳本依色相加飽和度門檻自動抓遮罩,全部角色共 57 格,不碰 AI。遮罩掛成 Secondary Texture,shader 在遮罩區取原像素明暗再去查配色漸層,沒有遮罩的種類就不換色。遮罩檢查 0 問題,預覽用 numpy 照 shader 重算,流程上很漂亮。
然後預覽一出來:太粗糙。直接放棄,不糾結。
做法 3:gpt-image 整張重畫
既然換色不夠好看,那重畫呢?用 gpt-image-2.5-flare、quality xhigh,拿原圖當參考圖整張生成,生成時就是透明底。先出黑色版和背上長晶石的版本當候選,第二輪再把晶石版往更華麗的方向出 4 個方向。
黑色版 4 次、晶石青藍 3 次、紫 2 次,共 9 次全部可用;外框差 ≤3px、腳底貼地。第二輪晶石版的四個方向又跑了 10 次。每次約 30 秒。
品質是五條路裡最好的,黑色版(以下叫基準 A)直接變成後面所有比較的標竿。問題在量:每格都得對齊重生,全部角色 57 格 × 2=114 張成品,照第一格平均要抽幾次推估約 180 次生成(推估,沒有實跑),而且還要祈禱每格都對得上。不過有一件事只有它做得到:像晶石這種要「長出新東西」的版本,換色是變不出來的,只能靠重畫。
做法 4:Meta SAM 2 部位遮罩,保留明暗換色
這條是本篇的轉折點。裝 SAM 2.1 的 hiera small/tiny 權重(torch、mps,本機 Mac 就能跑),只在第 1 格點 5 個要換色的部位,再把眼睛、腮紅點成保護區,然後用影片追蹤把遮罩傳到其餘 7 格,再在保留明暗的前提下換色。追蹤的用法照官方 README 的 video predictor 一節與 video_predictor_example.ipynb;官方文件只說明怎麼用,下面的速度與結果是這次自己量的。
追蹤穩到有點誇張:0 格要補點,遮罩邊界貼著描邊,遊戲格的剪影跟現有格逐像素一致,連播不會抖。追蹤 8 格約 12–16 秒(每格約 2 秒),換色每格約 0.4 秒,人工點選加調換色參數約 1 小時,下一個角色估計 10–20 分鐘。全程本機跑,未另付雲端費。以上都是同一個角色 8 格的試做紀錄。
缺點出在「只靠顏色分辨部位」這件事:翅鞘暗部陰影跟灰褐斑分不開,下緣會被染出一塊塊紅褐。而且黑色是把原圖壓暗得來的,少了亮面黑的立體感,原寸看起來就是比較髒。
做法 5:雲端 GPU 上的 ControlNet 線稿鎖形重上色
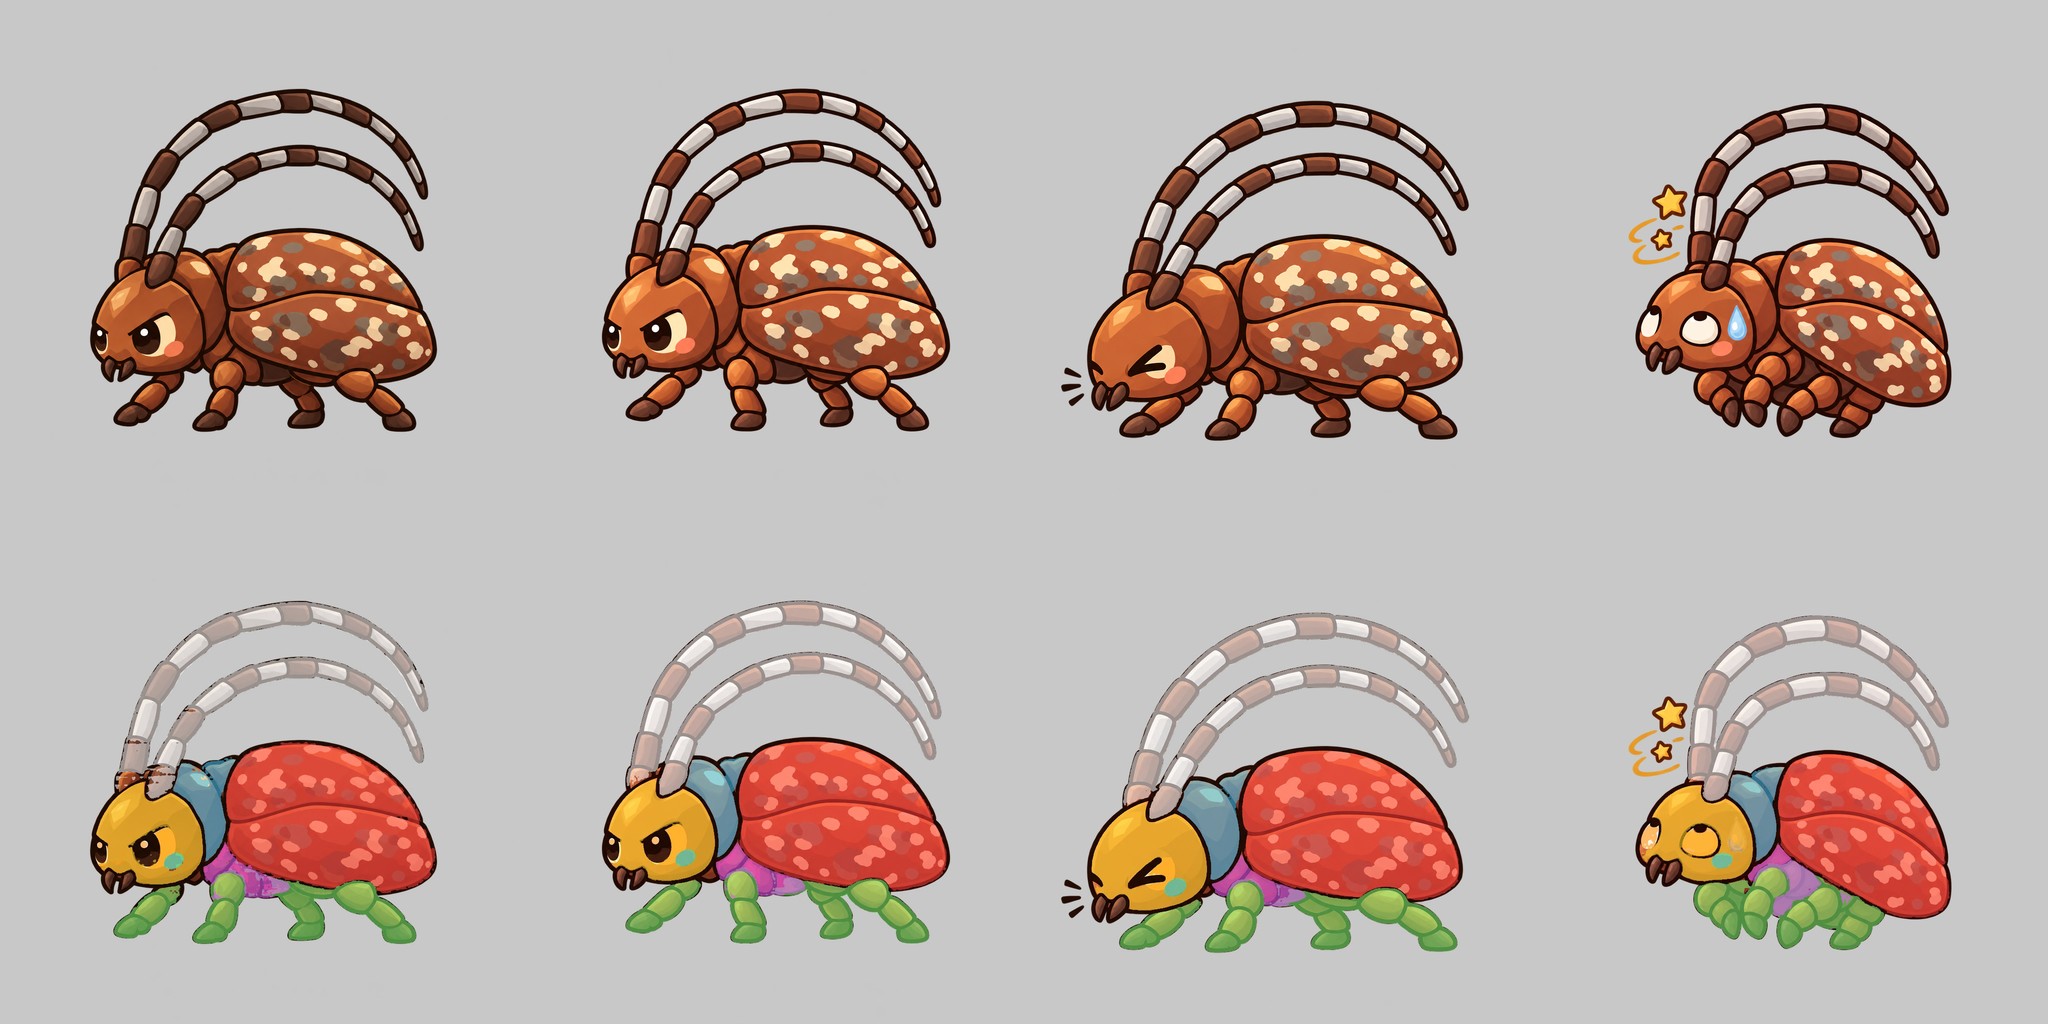
想要重畫的質感又不想 180 次手動對齊,那就讓 ControlNet 幫忙鎖形。雲端臨時開一台 L4 等級的 GPU,底模 SDXL base 1.0,用 lineart_anime 線稿(前處理權重取自 lllyasviel/Annotators)加原圖深色描邊,透過 ControlNet Union SDXL 1.0 promax(控制強度 0.9)鎖住形狀,IP-Adapter plus SDXL ViT-H(強度 0.6)拿基準 A 當風格參考,VAE 用 sdxl-vae-fp16-fix,走 txt2img、30 步、固定 seed,最後套回原 alpha。img2img 一開始也試了,會殘留褐色,先淘汰。
同一個角色 8 格 × 3 組(兩個 seed、兩種底模)沒有一格崩壞,三條路裡最像基準 A。這次試做自己量的跨格彩度標準差是 1.1,量法是 RGB 最大減最小,跟下表的 LAB 量法不同,兩個數字不能直接比。GPU 機開了約 0.9 小時(含裝環境、下載權重),照每小時單價估約 1.1 美元;每格約 17–18 秒。
但毛病不少:細節略糊;星星和汗滴被染成紅黑;換 seed 時閉眼會被畫成紅色怒眼;最煩的是斑點每格重新長,完全不照原圖位置,連播就是一團在跳的雜訊。
並排比較
表中「SAM 2 壓暗換色」是做法 4 的試做版,「SAM 2 部位遮罩+點色換色」是改成點色換色後的版本,最後一列是把兩條路混合的定案版。範圍:每一列都是同一個角色的 8 格;「一致性」欄的彩度標準差是同一張比較頁用同一把尺(LAB 彩度、跨 8 格)量的;時間與花費取自各做法那一次的紀錄,GPU 費用都是每小時單價乘開機時間的估算;gpt-image 的花費當時沒記。
| 做法 | 品質 | 一致性 | 時間 | 花費 |
|---|---|---|---|---|
| gpt-image 整張重畫 | 最好,當作比較基準(基準 A) | 要逐格對齊,外框差 ≤3px | 每次約 30 秒 | 沒記 |
| SAM 2 壓暗換色(試做) | 陰影會被染錯,原寸看得出來比較髒 | 剪影逐像素一致;彩度標準差 0.92 | 追蹤 8 格約 12–16 秒 | 未另付雲端費(本機) |
| ControlNet 線稿重上色 | 最像基準 A,但細節略糊 | 彩度標準差 0.51 | 每格約 17–18 秒 | 估約 1.1 美元(開機約 0.9 小時) |
| SAM 2 部位遮罩+點色換色 | 邊界最乾淨(描邊、眼睛、星星汗滴不動),但沒有重畫的質感 | 彩度標準差 0.37 | 本機 8 格追蹤 18 秒、換色每格 1.6 秒 | 未另付雲端費(本機) |
| ControlNet img2img 從換色結果重上色+鎖定遮罩(定案) | 有 ControlNet 的重畫質感;斑點、眼睛、效果符號照換色結果 | 斑點位置重疊平均 0.94(最低 0.88)、多長出來的斑點平均 0.11%(最高 0.15%) | 每格約 10–13 秒 | 整場 GPU 開機 83 分鐘(修法比較 32 張+全部角色 114 格,共 146 張),估約 1.6 美元 |
定案:換色結果餵 ControlNet 重上色,鎖定區換回,晶石不做
看表就知道兩邊各有一半是對的。SAM 2 部位遮罩+點色換色邊界最乾淨、斑點位置照原圖、跨格最一致(彩度標準差 0.37 vs CN 0.51),也不用另付雲端費;ControlNet 最有重畫的質感,但斑點每格重新長。那就各拿一半:把換色結果當 ControlNet img2img 的起點(強度 0.55),線稿鎖形、IP-Adapter 參考圖也改用換色結果的第一格,跑完再用鎖定遮罩把斑點、花紋、眼睛等保護部位、星星汗滴等效果符號換回換色結果,順便擋掉 ControlNet 自己多長出來的斑點。
數字很直接:同一個角色 8 格,斑點位置重疊平均從 txt2img 的 0.55(多長 3.9%)變成 0.94(多長 0.11%)。強度降到 0.40 可以到 0.95(多長 0.08%),但出來幾乎等於換色結果,ControlNet 的質感就沒了,0.55 是甜蜜點。中途還試過把斑點邊界畫進線稿,結果斑點被描上黑框,淘汰。
這條路定下來之後,要再出其他配色也只是換一組色票。晶石不做:要長出新形狀只能整張重畫,而換色加重上色已經夠用。
沉澱出的工具:部位遮罩換色與 ControlNet 混合
第一支是通用的部位遮罩換色,分 grid/segment/sample/apply/review 五步,設定檔存檔後可重跑,另有 lock 一步輸出「換色結果+鎖定遮罩」給下游;不同造型的角色都能用,另一個角色的異色兩案 22 格也是 0 格補點。第二支負責 ControlNet 混合(GPU 端出圖另外用一支線稿重上色的腳本):產 img2img 設定、把 ControlNet 成品和換色結果按鎖定遮罩合成、擋多長出來的斑點、算斑點穩定度。
想自己試的話,流程長這樣
- 把一組動作格切成單格。
- 在第一格點選要換色的部位和保護區(眼睛等),並把斑點、花紋這類要固定的色類標成鎖定。
- 用 SAM 2 影片追蹤把遮罩傳到其餘各格。
- 取樣原配色,指定新的主色或色票,在 LAB 色彩空間保留明暗、只改遮罩區色度,得到換色結果與鎖定遮罩。
- 開一台臨時 GPU,用換色結果當 img2img 起點(強度 0.55)、線稿鎖形、IP-Adapter 參考換色結果第一格,逐格重上色;跑完就關機。
- 合成:ControlNet 成品 ×(1 − 鎖定)+換色結果 × 鎖定,羽化 1 像素,再擋掉 ControlNet 多長出來的斑點。
- 算斑點位置重疊率,產出疊圖檢查頁,深淺兩底各看一次,再用遊戲裡的實際大小看一次。
# 部位遮罩換色:保留原像素明暗,只改遮罩區色度(LAB)
# 步驟 1:用 Meta SAM 2 的影片預測器,在第 1 格點選部位,
#         再追蹤到其餘各格,每格存一張黑白遮罩(白=要換色)
#         (呼叫方式請照 SAM 2 官方 README 的 video predictor 範例)
import numpy as np
from PIL import Image
from skimage import color

def recolor(frame_png, mask_png, target_rgb, keep_light=1.0):
    img = Image.open(frame_png).convert("RGBA")
    rgba = np.asarray(img).astype(np.float32) / 255.0
    mask = np.asarray(Image.open(mask_png).convert("L")) > 127
    lab = color.rgb2lab(rgba[..., :3])
    tgt = color.rgb2lab(np.array([[target_rgb]], np.float32) / 255.0)[0, 0]
    # L(明暗)保留原值,a/b(色度)換成目標色
    lab[..., 0][mask] *= keep_light
    lab[..., 1][mask] = tgt[1]
    lab[..., 2][mask] = tgt[2]
    out = np.clip(color.lab2rgb(lab), 0, 1)
    rgba[..., :3] = out
    # alpha 原樣套回,不另外去背
    return Image.fromarray((rgba * 255).astype(np.uint8), "RGBA")

# 步驟 2:逐格套用,再疊在深淺兩種底色上檢查
# for i in range(8):
#     recolor(f"frames/{i:02d}.png", f"masks/{i:02d}.png", (40, 40, 48)).save(f"out/{i:02d}.png")

# 步驟 3:換色結果交 ControlNet img2img 重上色(strength 0.55)後,
#         用鎖定遮罩把斑點、眼睛、效果符號換回換色結果
def compose(cn_png, recolor_png, lock_png):
    cn  = np.asarray(Image.open(cn_png).convert("RGBA")).astype(np.float32) / 255.0
    rec = np.asarray(Image.open(recolor_png).convert("RGBA")).astype(np.float32) / 255.0
    lock = (np.asarray(Image.open(lock_png).convert("L")).astype(np.float32) / 255.0)[..., None]
    out = cn * (1.0 - lock) + rec * lock      # 鎖定區照換色結果,其餘照 ControlNet
    out[..., 3] = rec[..., 3]                 # alpha 照原稿
    return Image.fromarray((out * 255).astype(np.uint8), "RGBA")
這次比較的方式順便講一下,省得有人問:原圖、換色版、重畫基準排同一列,深淺兩底各看一次,再縮到遊戲畫面的實際大小看一次;整套連播成 gif 看抖不抖,再算跨格彩度標準差看一致性。三條路最後各有各的位置:只換顏色、每格要一致、不想另付雲端費,SAM 2 部位遮罩換色就夠;要重畫的質感、斑點又不能亂跑,換色結果餵給 ControlNet img2img 再用鎖定遮罩換回;要長出新形狀(例如晶石),只剩整張重畫。
適用範圍是只換顏色、不改造型的 2D 序列幀,敵人、主角都行。只靠顏色分辨部位時,暗部陰影和相近色斑點可能分不開,點選和保護區要調。授權逐項查過,以各模型卡的標示為準:
- SAM 2.1 程式碼與 hiera small/tiny 權重:Apache-2.0。
- SDXL base 1.0:CreativeML Open RAIL++-M,可商用,但要遵守條款裡的使用限制,並把限制帶給下游。
- ControlNet Union SDXL 1.0 promax:Apache-2.0。實際載入的是社群轉成 diffusers 格式的 brad-twinkl/controlnet-union-sdxl-1.0-promax,也標 Apache-2.0。
- IP-Adapter plus SDXL ViT-H(含 image encoder):Apache-2.0。
- sdxl-vae-fp16-fix:MIT。
- lineart_anime 線稿器權重(Annotators 裡的 netG.pth):模型卡只標 other,沒有寫出條款,這一項授權不明;要商用得先問清楚,或換成授權寫明的線稿器。
— 邱柏宇
Five Ways to Recolor 2D Characters: From SAM 2 Recolor to a ControlNet Repaint
If you make 2D games you have met this one: the same character needs a few more color variants, they have to read at a glance, and every frame of the animation set has to match. Sounds like “just shift the hue”. In practice it took five routes. The stack was Unity plus Python, with per-frame PNG sprites. Spoiler: the final pick is ControlNet img2img recoloring, but the starting point is not the original sprite. It is the output of a Meta SAM 2 part-mask recolor, and after the repaint a lock mask swaps spots, eyes and effect marks back. Here is how each route crashed, or survived.
Approach 1: whole-sprite hue shift in a Unity Sprite shader
The obvious move. A UI/Sprite hue-shift shader with hue offset plus small saturation and brightness tweaks, stackable with the existing tint effects. One variant leaned red-purple, the other cyan-blue, with offline previews computed in PIL from the shader formula so nobody had to round-trip through Unity.
In screenshots from a game build the characters were distinguishable on dark, light and in-game backgrounds, outlines and highlights intact. Usable. But a whole-sprite shift is a whole-sprite shift: eyes, spots and effect marks all move with it. After comparing recolor methods the plan switched to mask recolor plus a gradient map plus a small marker, and this one left the building.
Approach 2: auto color-region masks plus a gradient map
Fine, do not recolor the whole thing, only the parts that should change. A script grabbed masks using hue and saturation thresholds: 57 frames across all characters, no AI involved. The mask went on as a Secondary Texture; the shader took the original pixel’s brightness inside the mask and looked it up in a color gradient. Types without a mask stayed as they were. Mask checks found 0 problems, previews were recomputed in numpy to match the shader. On paper, lovely.
Then the preview came back: too rough. Dropped, no second thoughts.
Approach 3: full redraw with gpt-image
If recoloring does not look good enough, what about repainting? gpt-image-2.5-flare at quality xhigh, original as the reference image, each frame generated whole and transparent from the start. A black version and a version with crystals growing on the back came first as candidates, then a second round pushed the crystal version toward fancier in 4 directions.
The black version took 4 runs, cyan-blue crystal 3, purple 2: 9 in total, all usable, outline difference ≤3px, feet on the ground. The second round took another 10 runs across the four crystal directions. About 30 seconds per run.
Quality was the best of the five, and the black version (Baseline A from here on) became the yardstick for everything after. The catch is volume: every frame has to be regenerated and aligned, 57 frames × 2 = 114 finished images across all characters, projected at around 180 generations from the retry rate on the first frame (a projection, not a run), plus praying every frame lines up. One thing only this route can do, though: anything that grows new geometry, like crystals, cannot come out of a recolor. Redraw or nothing.
Approach 4: Meta SAM 2 part masks with brightness-preserving recolor
This is where the story turns. SAM 2.1 hiera small/tiny weights (torch, mps, runs on a local Mac). On frame 1 only, click 5 parts to recolor plus the eyes and blush as protected regions, let video tracking carry the masks to the other 7 frames, then recolor while preserving luminance. Tracking follows the video predictor section of the official README and video_predictor_example.ipynb; the official docs only cover usage, and the speeds and results below are our own measurements.
Tracking was almost suspiciously stable: 0 frames needed extra clicks, mask edges hugged the outlines, silhouettes matched the existing frames pixel for pixel, and playback did not jitter. Tracking 8 frames took about 12–16 seconds (about 2 seconds per frame), recoloring about 0.4 seconds per frame, manual clicking plus tuning about 1 hour, and an estimated 10–20 minutes for the next character. Everything ran locally, with no cloud spend. All of this comes from one 8-frame character trial.
The weakness is the “parts separated by color alone” part: dark shading on the wing cases could not be told apart from gray-brown spots, so the lower edge got blotches of reddish brown. And black came from darkening the original, so it lacked the dimensionality of a glossy black. At actual size it simply looked dirtier.
Approach 5: ControlNet lineart recolor on a cloud GPU
Want the repainted look without 180 rounds of manual alignment? Let ControlNet hold the shape. A temporary L4-class GPU in the cloud, SDXL base 1.0 as the base model, lineart_anime lines (preprocessor weights from lllyasviel/Annotators) plus the original’s dark outlines, shape locked through ControlNet Union SDXL 1.0 promax (conditioning scale 0.9), IP-Adapter plus SDXL ViT-H (scale 0.6) using Baseline A as the style reference, sdxl-vae-fp16-fix as the VAE, txt2img with 30 steps and a fixed seed, original alpha pasted back. img2img was tried here too; it left brown residue and was dropped for now.
One character, 8 frames × 3 sets (two seeds, two base models), no broken frame, the closest to Baseline A of the three routes. This trial’s own cross-frame saturation std was 1.1, measured as RGB max minus min; that is a different ruler from the LAB measure in the table below, so the two numbers are not comparable. The GPU machine ran about 0.9 hours including setup and weight downloads, estimated at about 1.1 USD from the hourly rate; 17–18 seconds per frame.
Plenty of warts though: details slightly blurry; stars and sweat drops turned red-black; a different seed could turn a closed eye into an angry red one; and worst of all, spots regrew in every frame instead of following the original positions, so playback was a cloud of dancing noise.
Side by side
“SAM 2 darken recolor” is the trial version of approach 4; “SAM 2 part mask + picked-color recolor” is the version using picked colors; the last row is the final blend of the two routes. Scope: every row is the same character’s 8 frames; the saturation std in the Consistency column was measured on one comparison page with one ruler (LAB chroma across 8 frames); time and cost come from each approach’s own run, and GPU costs are estimates from the hourly rate times uptime. The gpt-image cost was not recorded at the time.
| Approach | Quality | Consistency | Time | Cost |
|---|---|---|---|---|
| gpt-image full redraw | Best, used as the baseline (Baseline A) | Needs per-frame alignment, outline difference ≤3px | About 30 seconds per run | Not recorded |
| SAM 2 darken recolor (trial) | Shadows get mis-tinted; looks dirtier at actual size | Silhouette identical pixel for pixel; saturation std 0.92 | Tracking 8 frames about 12–16 seconds | No cloud spend (local) |
| ControlNet lineart recolor | Closest to Baseline A, details slightly blurry | Saturation std 0.51 | About 17–18 seconds per frame | Est. about 1.1 USD (about 0.9 hours of uptime) |
| SAM 2 part mask + picked-color recolor | Cleanest edges (outlines, eyes, stars and sweat drops untouched), but no repainted look | Saturation std 0.37 | Local: 8-frame tracking 18 seconds, recolor 1.6 seconds per frame | No cloud spend (local) |
| ControlNet img2img from the recolor result + lock mask (chosen) | ControlNet’s repainted look; spots, eyes and effect marks follow the recolor result | Spot position overlap 0.94 on average (lowest 0.88), extra spots 0.11% on average (highest 0.15%) | About 10–13 seconds per frame | 83 minutes of GPU uptime for the whole session (32 fix-comparison images + 114 frames for all characters, 146 in total), est. about 1.6 USD |
The decision: feed the recolor result to ControlNet, swap locked regions back, no crystals
The table says it: each side is half right. SAM 2 part masks with picked-color recolor had the cleanest edges, spots exactly where the original has them, the best cross-frame consistency (saturation std 0.37 vs CN 0.51), and needed no cloud spend. ControlNet had the most repainted look, but spots regrew on every frame. So take half of each: the recolor result becomes the img2img starting point (strength 0.55), the lineart lock and the IP-Adapter reference also switch to the recolor result’s first frame, and afterwards a lock mask swaps spots, patterns, protected parts such as eyes, and effect marks such as stars and sweat drops back to the recolor result, while a guard removes spots ControlNet grew on its own.
The numbers are blunt: on one character’s 8 frames, average spot overlap went from 0.55 with txt2img (3.9% extra spots) to 0.94 (0.11% extra). Strength 0.40 reached 0.95 (0.08% extra) but came out nearly identical to the plain recolor, so the ControlNet look was gone; 0.55 is the sweet spot. Drawing spot edges into the lineart was also tried. It gave the spots black frames. Dropped.
With that settled, further palettes are just another set of swatches. No crystals: growing new shapes needs a full redraw, and recolor plus repaint is enough.
Tools that came out of it: part-mask recolor and the ControlNet blend
The first is a general part-mask recolor in five steps, grid, segment, sample, apply and review, driven by a saved config that can be rerun, plus a lock step that outputs the recolor result and a lock mask for downstream. It works for characters of different shapes; another character got two alternate colors across 22 frames, also with 0 frames needing extra clicks. The second handles the ControlNet blend (GPU-side generation runs in a separate lineart-recolor script): it writes the img2img config, composes ControlNet output with the recolor result through the lock mask, guards against extra spots and measures spot stability.
If you want to try it, the flow looks like this
- Split an animation set into single frames.
- On the first frame, click the parts to recolor and the protected areas (eyes and so on), and mark color classes that must stay put, such as spots and patterns, as locked.
- Use SAM 2 video tracking to carry the masks to the remaining frames.
- Sample the original palette, assign new main colors or swatches, and recolor in LAB space keeping lightness and changing only chroma inside the masks, which yields the recolor result and the lock mask.
- Start a temporary GPU, run img2img from the recolor result (strength 0.55) with lineart locking the shape and the recolor result’s first frame as the IP-Adapter reference, frame by frame; shut it down when done.
- Compose: ControlNet output × (1 − lock) + recolor result × lock, feathered by 1 pixel, then remove spots ControlNet grew on its own.
- Measure spot overlap, build the overlay check page, inspect on dark and light backgrounds, then at actual in-game size.
# Part-mask recolor: keep per-pixel lightness, change only chroma inside the mask (LAB)
# Step 1: use the Meta SAM 2 video predictor, click parts on frame 1,
#         track to the remaining frames, save one black/white mask per frame (white = recolor)
#         (follow the video predictor example in the official SAM 2 README)
import numpy as np
from PIL import Image
from skimage import color

def recolor(frame_png, mask_png, target_rgb, keep_light=1.0):
    img = Image.open(frame_png).convert("RGBA")
    rgba = np.asarray(img).astype(np.float32) / 255.0
    mask = np.asarray(Image.open(mask_png).convert("L")) > 127
    lab = color.rgb2lab(rgba[..., :3])
    tgt = color.rgb2lab(np.array([[target_rgb]], np.float32) / 255.0)[0, 0]
    # keep L (lightness), replace a/b (chroma) with the target color
    lab[..., 0][mask] *= keep_light
    lab[..., 1][mask] = tgt[1]
    lab[..., 2][mask] = tgt[2]
    out = np.clip(color.lab2rgb(lab), 0, 1)
    rgba[..., :3] = out
    # alpha pasted back as is, no background removal
    return Image.fromarray((rgba * 255).astype(np.uint8), "RGBA")

# Step 2: apply per frame, then check on dark and light backgrounds
# for i in range(8):
#     recolor(f"frames/{i:02d}.png", f"masks/{i:02d}.png", (40, 40, 48)).save(f"out/{i:02d}.png")

# Step 3: after ControlNet img2img repaint (strength 0.55) from the recolor result,
#         swap spots, eyes and effect marks back using the lock mask
def compose(cn_png, recolor_png, lock_png):
    cn  = np.asarray(Image.open(cn_png).convert("RGBA")).astype(np.float32) / 255.0
    rec = np.asarray(Image.open(recolor_png).convert("RGBA")).astype(np.float32) / 255.0
    lock = (np.asarray(Image.open(lock_png).convert("L")).astype(np.float32) / 255.0)[..., None]
    out = cn * (1.0 - lock) + rec * lock      # locked regions from the recolor, the rest from ControlNet
    out[..., 3] = rec[..., 3]                 # alpha from the original
    return Image.fromarray((out * 255).astype(np.uint8), "RGBA")
How the comparison was run, since someone will ask: original, recolored version and redraw baseline in one row, viewed on dark and light backgrounds, then shrunk to in-game size; the full set played as a looping gif to check jitter, plus cross-frame saturation standard deviation for consistency. Where the three routes ended up: color-only changes with per-frame consistency and no cloud spend, SAM 2 part-mask recolor is enough; a repainted look with spots that stay put, feed the recolor result to ControlNet img2img and swap the locked regions back; new shapes (crystals, say), a full redraw is the only route left.
The method fits 2D frame sequences where only color changes and the shape stays, enemies and player characters alike. When parts are separated by color alone, dark shading and similar-colored spots may not separate, so clicks and protected zones need tuning. Licensing, checked item by item against each model card:
- SAM 2.1 code and hiera small/tiny weights: Apache-2.0.
- SDXL base 1.0: CreativeML Open RAIL++-M. Commercial use is allowed, but the license’s use restrictions apply and must be passed on downstream.
- ControlNet Union SDXL 1.0 promax: Apache-2.0. What we actually loaded was the community diffusers conversion brad-twinkl/controlnet-union-sdxl-1.0-promax, also marked Apache-2.0.
- IP-Adapter plus SDXL ViT-H (with its image encoder): Apache-2.0.
- sdxl-vae-fp16-fix: MIT.
- lineart_anime weights (netG.pth in Annotators): the model card only says “other” and gives no terms, so this one is unclear. Clear it before commercial use, or swap in a line extractor with stated terms.
— 邱柏宇
延伸閱讀
- n8n webhook 連四週靜默沒觸發:內容指紋去重把失敗件永久擋死
- 字幕切片貼齊停頓,6 片變成 0 秒
- invalid_auth 之後 is_connected() 還是 True:Slack bot 靜默近 12 小時
- [TOYOTA]ハイブリッド侍
- 白閃轉場讓 iPhone 卡住:同一支 H.264 混了 4:4:4
https://justfly.idv.tw/s/knuSKQh